Ring up the Internet
Making a wireless doorbell Internet-ready with some hardware upgrades
It's amazing what technology is capable of nowadays. For example, there are battery-powered buttons (interestingly enough, not necessarily operated with a button cell battery) that when they are pressed at the door, a doorbell will ring. It's magic. But what if you don't want to hear Für Elise (or one of the other 35 classic melodies the device offers) for the thousandth time? What if you want to receive a push notification on your phone?
Of course, there are commercially available devices that could do that, but we could choose a different path and try to make the current doorbell smarter. I hope I don't have to stress that everybody does everything at their own risk, but below you can find my experience.
Ring me up

I have a similar doorbell than on the image above. On the left is the outdoor unit. It's a battery-powered button. On the right are the indoor units, which you can plug into a wall socket. I started the project by taking a closer look at the latter.
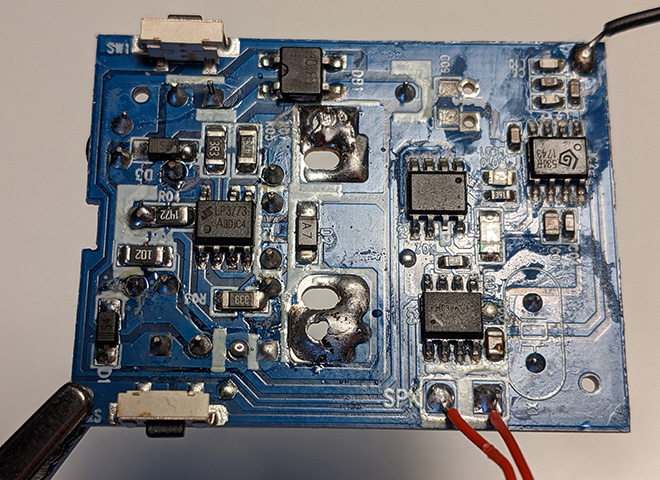
A later stage of the visual inspection
The two bigger holes at the center are where the two pins of the socket plug were attached. I had to solder them out to be able to peel off the casing from the PCB. It's even better this way. After I tinkered with it, I wouldn't want to plug it back into the wall. So our first item on the agenda is to find out how much voltage the components need and how I can provide it for them.
The voltage is dropping
To the left from the socket connection, there is an IC with the LP3773 A3DjC4 label (or maybe that j is an i, or just a scratch, it's hard to tell). I tried to find some information about that first. I found the datasheet of the LP3773A, and I hoped that the name was similar enough for it to be helpful. Unfortunately, most of it was written in Chinese, so I had a hard time deciphering it.
But at last, I found the relevant part, for an input voltage between 90V and 265V, its output voltage will be 5V. So next, we need a connection point.
My plan was to search for a couple of other components' datasheets and try to trace the "lines" until I found a suitable place. There is the antenna in the top right corner, and there is an IC near it that most likely will be in charge of the radio signal processing. Based on the 531R 1743 label and the little swirly logo, I guessed that the datasheet of Synoxo SYN531R would be good enough and found the following pinout there:
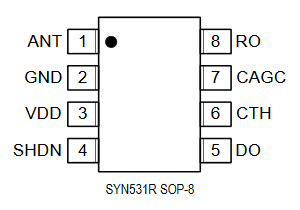
The GND and VDD connection right next to the ANT will be interesting for us. It's a single-layer PCB, so with some background light, we can follow them.

Let there be light
The GND connects into the nice big chunk above the IC, but we cannot see where the VDD goes. Checking it out from different angles, it looked like it goes under the IC and comes out on the left. In both cases, we end up on a connection point (marked as C09 on the PCB) which should hold a capacitor maybe. No worries, I soldered two cables into the two holes, plugged them into 5V, and lo and behold, the doorbell worked.
Looney Tunes
In its original state, our doorbell blinks and plays music when someone pushes the button. The LED is built right into the circuit, but the speaker is just dangling from the bottom of the PCB on two cables. There is another IC nearby we can look up. Based on the FR0396-E2 label, I found another Chinese datasheet with the required diagram.
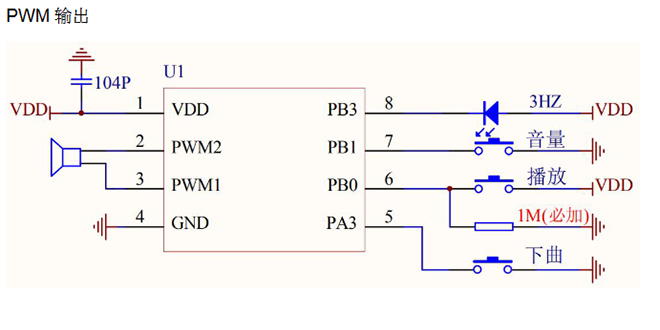
The speaker is attached to the PWM1 and PWM2 pins, but we could connect it to a Raspberry Pi, for example. It couldn't handle PWM inputs, but we don't want to reproduce the melody from the signal. If something is changing there (because it starts to play a melody), then we want to know about it, and that's enough for our purposes.
Internet of Doorbells
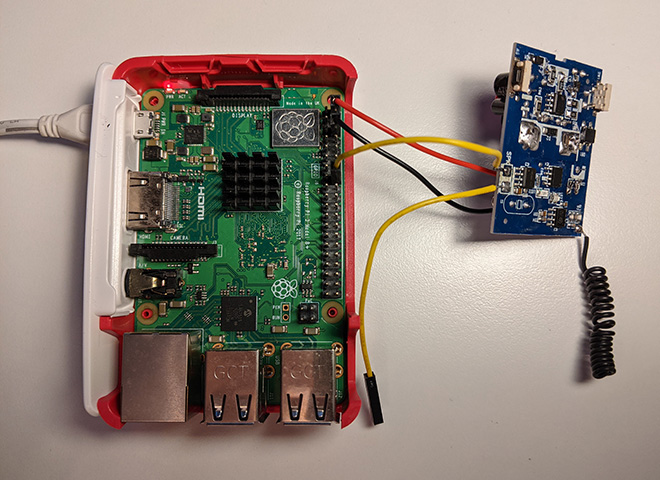
It's nice that it works with 5V because this way, we can power it directly from the Raspberry Pi. I connected one of the speaker outputs to pin 23. We only need a little bit of Python code to handle the incoming rings.
import signal
import sys
import RPi.GPIO as GPIO

def signal_handler(sig, frame):
    GPIO.cleanup()
    sys.exit(0)

def button_pressed_callback(channel):
    print('Ding-dong')

if __name__ == '__main__':
    GPIO.setmode(GPIO.BCM)

    GPIO.setup(23, GPIO.IN, pull_up_down=GPIO.PUD_UP)

    GPIO.add_event_detect(23, GPIO.RISING, callback=button_pressed_callback, bouncetime=30000)

    signal.signal(signal.SIGINT, signal_handler)
    signal.pause()
Naturally, we can come up with something more clever than print('Ding-dong') when the button is pressed. Sending messages, turning relays on or off, or anything your heart desires. Vigilant readers may have noticed the unusually high bounce time of the event detection. We need that because the melody can be 10-15 seconds long, and we don't want to handle that as separate events.
That would be it. The smartening of a dumb wireless doorbell. I have plans to develop an alternate solution where we would use a generic radio signal receiver, so we don't have to take apart the indoor unit. Maybe in another post. Until then, have a good ringing.