Light at the end of the tunnel
Accessing your local machine from the Internet through SSH

It could happen that we want to give someone access to some stuff that's running on our computer. Say you're developing an application and you want to share the current state with someone without having to push every little change and then wait for the build to finish to see the changes on the staging environment.
Depending on the network, this can be a rather complicated operation (firewalls, port forwarding, NAT traversal). Perhaps that's why there are services to solve this problem (quite a few, actually), but it wouldn't be a very interesting post if we'd go in that direction.
Rather, we will try to look for common household items that can solve this problem. One such tool is the SSH client, which almost everyone has at the bottom of their drawer (especially since it's been part of Windows for a while). In addition, we'll need a parchment-lined baking sheet publicly available server (like a cheap VPS from a cloud provider) and we're ready to get this party started.
Easy mode
Say, we have an application on the local machine that waits for incoming connections at 127.0.0.1:8080. We will simulate this with a simple Python HTTP server:
local:~$ mkdir fake-app
local:~$ cd fake-app
local:~/fake-app$ echo 'hello world' >index.html
local:~/fake-app$ python -m http.server -b 127.0.0.1 8080
Serving HTTP on 127.0.0.1 port 8080 (http://127.0.0.1:8080/) ...
Let's grab another terminal and try it out:
local:~$ curl 127.0.0.1:8080
hello world
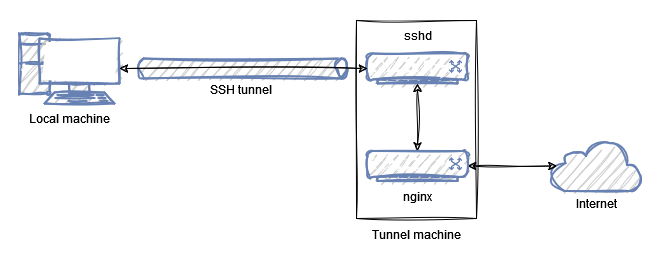
We also have a VPS, which we named tunnel.example.org. With this setup, we can issue the following command on our local machine:
local:~$ ssh -R 8080:127.0.0.1:8080 user@tunnel.example.org
This will allow us to access our local application on the tunnel machine on port 8080 (SSH remote port forwarding). You can try this on the tunnel machine:
tunnel:~$ curl 127.0.0.1:8080
hello world
SSH will bind to 127.0.0.1 on the server (probably for security reasons), so we won't be able to access the application from outside, even if our firewall rules would otherwise allow it.
local:~$ curl tunnel.example.org:8080
curl: (7) Failed to connect to tunnel.example.org port 8080 after 30 ms: Couldn't connect to server
This can be circumvented by changing GatewayPorts in /etc/ssh/sshd_config to clientspecified and slightly modifying our ssh command:
local:~$ ssh -R 0.0.0.0:8080:127.0.0.1:8080 user@tunnel.example.org
Now this should work if you also have the right firewall settings:
local:~$ curl tunnel.example.org:8080
hello world
It may be a good solution for your own use, but it would be a bit more elegant to stick with the first version and start an nginx on the tunnel machine instead, which forwards requests to 127.0.0.1:8080:
/etc/nginx/sites-available/tunnel
server {
    listen 80;
    server_name tunnel.example.org;

    location / {
        proxy_pass http://127.0.0.1:8080/;
    }
}
Enabling the site and reloading the nginx configuration:
tunnel:~# ln -s /etc/nginx/sites-available/tunnel /etc/nginx/sites-enabled/
tunnel:~# systemctl reload nginx
And we're done:
local:~$ curl tunnel.example.org
hello world
Maybe nginx seems like overkill in this situation, but once it's there, we can use it for other things as well:
- a custom error page if the local application is not running or we are not connected via ssh
- logging
- HTTPS between nginx and external clients
- mTLS between the local application and nginx (this would probably need another nginx on the local machine as well)
- basic authentication for external clients
There you have it, our simple solution, using a not-too-complicated SSH command to share your local application with others. The only drawback is that only one person can use it to share only one application on a fixed address. Probably 99% of the time this will be enough, but let's look at a slightly more complicated solution. Just for the fun of it.
Advanced mode
There is a nice feature in the SSH client that if you set the remote port to zero in the command then it will listen on a random port on the remote machine:
local:~$ ssh -R 0:127.0.0.1:8080 user@tunnel.example.org
Allocated port 41025 for remote forward to 127.0.0.1:8080

[...]
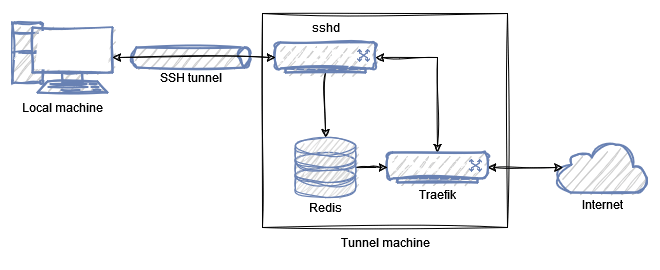
So, we could do something like generating a random host when connecting (<random>.tunnel.example.org), and nginx would forward requests coming to this random host to the appropriate port on the tunnel machine. This would solve our one-person/one-application problem.
As far as I can tell, nginx does not excel at dynamic configurations. You could generate files and reload nginx, but this solution does not appeal to me so much. Then I remembered that Traefik is nice and dynamic, it has a provider that can configure things based on Redis key-values, so I started to go in that direction.
The Traefik installation is not too friendly if you don't want to use Docker. But Docker (Swarm) on the other hand is not too friendly in accessing services listening on 127.0.0.1 on the host machine, so we're still better off with that.
There's nothing left to do but download the binary and run it somehow.
tunnel:~# mkdir -p /opt/traefik
tunnel:~# cd /opt/traefik
tunnel:/opt/traefik# wget https://github.com/traefik/traefik/releases/download/v2.10.5/traefik_v2.10.5_linux_amd64.tar.gz
tunnel:/opt/traefik# tar -xf traefik_v2.10.5_linux_amd64.tar.gz
tunnel:/opt/traefik# rm traefik_v2.10.5_linux_amd64.tar.gz
My first thought was just to get away with running a ./traefik --providers.redis.endpoints=127.0.0.1:6379 --entrypoints.web.address=:80 & command and let it do its things in the background. That would be enough to test things, but in the end, I just created a systemd service file for it.
/etc/systemd/system/traefik.service
[Unit]
Description=traefik
After=network-online.target
Wants=network-online.target systemd-networkd-wait-online.service

[Service]
Restart=on-abnormal
User=traefik
Group=traefik
ExecStart=/opt/traefik/traefik --providers.redis.endpoints=127.0.0.1:6379 --entrypoints.web.address=:80
CapabilityBoundingSet=CAP_NET_BIND_SERVICE
AmbientCapabilities=CAP_NET_BIND_SERVICE
NoNewPrivileges=true
To make it work, we need a traefik user and group, and a Redis server.
tunnel:~# adduser --disabled-login --disabled-password --no-create-home traefik
tunnel:~# apt-get install redis-server
Then we just have to reload the systemd related things.
tunnel:~# systemctl daemon-reload
tunnel:~# systemctl start traefik.service
First of all, I wanted to reproduce the original behavior before I started to figure out the dynamic parts, so I set the following key-value pairs in Redis:
tunnel:~# redis-cli
127.0.0.1:6379> SET traefik/http/services/tunnel-service/loadbalancer/servers/0/url http://127.0.0.1:8080/
127.0.0.1:6379> SET traefik/http/routers/tunnel-router/rule Host(`tunnel.example.org`)
127.0.0.1:6379> SET traefik/http/routers/tunnel-router/entrypoints/0 web
127.0.0.1:6379> SET traefik/http/routers/tunnel-router/service tunnel-service
We have a service listening on 127.0.0.1:8080 and a router rule that directs requests to tunnel.example.org on port 80 (the web entry point defined when we started Traefik) to our service. Fortunately, this worked just like the original nginx solution, so we're ready to dynamize.
My idea was based on the fact that you could specify a custom command in the authorized_keys file that runs on every SSH connection (this is how Git pull/push works over SSH, for example). Here you could specify a small shell script that would add the appropriate key-value pairs to Redis, and then just wait until the user closes the connection. On closing, it would clean up the Redis keys that were generated.
To do this, you may want to add a separate user so that you can continue to use SSH traditionally with your original user:
tunnel:~# adduser --disabled-password mole
In the authorized_keys file, we add a line with our SSH key:
/home/mole/.ssh/authorized_keys
command="/home/mole/tunnel.sh",no-X11-forwarding,no-agent-forwarding <SSH key>
The command would have a structure like this:
/home/mole/tunnel.sh
#!/bin/bash -e

setup() {
    # setup
}

cleanup() {
    # cleanup
    exit 0
}

trap 'cleanup' INT

setup
tail -f /dev/null
An important feature here is the trap 'cleanup' INT, which can catch the closing of our connection script with Ctrl+C so we can run our cleanup code. The tail -f /dev/null part just waits till the end of time.
Of course, we also need to make this file executable:
tunnel:~# chmod +x /home/mole/tunnel.sh
Now we just need to find the ports that the current SSH connection has opened. To do this, we need the ID of the sshd process, which is the parent of our running script, so we can get it with the following command:
tunnel:~$ grep PPid /proc/$$/status | awk '{ print $2 }'
123263
In bash, $$ is the current process ID, and the /proc directory contains a lot of interesting informations once you know the process ID.
We have the parent process ID, now we just need to find information about the sockets. lsof is a great tool for this, the only problem is that it only returns the information we need for the root user.
As a test, I added the mole user to sudoers to be able to run lsof as root, but I don't know if this is a good idea from a security point of view (for example, if lsof has some lesser-known feature to get a root shell out of it).
/etc/sudoers.d/10-mole-lsof
mole ALL=(root) NOPASSWD: /usr/bin/lsof
So, now we can get the information we need:
tunnel:~$ sudo lsof -a -nPi4 -sTCP:LISTEN -p 123263
COMMAND    PID USER   FD   TYPE  DEVICE SIZE/OFF NODE NAME
sshd    123263 mole    9u  IPv4 1569356      0t0  TCP 127.0.0.1:45991 (LISTEN)
sshd    123263 mole   11u  IPv4 1569360      0t0  TCP 127.0.0.1:39421 (LISTEN)
It has quite a few flags, -a indicates that you want AND relation between the filters, -n tells it not to make hostnames out of IP addresses, -P tells it not to make port numbers into port names, -i filters for IPv4 connections, -s filters for servers listening on TCP, and -p is used to specify the process id. With a little bit of awk magic, you'll quickly have ip:port pairs:
tunnel:~$ sudo lsof -nPi4 -sTCP:LISTEN -p 123263 -a | awk '/127.0.0.1:/ { print $9 }'
127.0.0.1:45991
127.0.0.1:39421
This gives us all the details we need to put together our script:
/home/mole/tunnel.sh
#!/bin/bash -e
PID=$(grep PPid /proc/$$/status | awk '{ print $2 }')

declare -A mapping
for app in $(sudo lsof -a -nPi4 -sTCP:LISTEN -p $PID | awk '/127.0.0.1:/ { print $9 }'); do
  mapping[$(pwgen -A0sBv 10 1)]="$app"
done

setup() {
    for key in "${!mapping[@]}"; do
        redis-cli <<EOF >/dev/null
MULTI
SET traefik/http/services/${key}-service/loadbalancer/servers/0/url http://${mapping[$key]}/
SET traefik/http/routers/${key}-router/rule Host(\`${key}.tunnel.example.org\`)
SET traefik/http/routers/${key}-router/entrypoints/0 web
SET traefik/http/routers/${key}-router/service ${key}-service
EXEC
EOF
        echo "http://${key}.tunnel.example.org/ -> ${mapping[$key]}"
    done
}

cleanup() {
    for key in "${!mapping[@]}"; do
        redis-cli <<EOF >/dev/null
MULTI
DEL traefik/http/routers/${key}-router/rule
DEL traefik/http/routers/${key}-router/entrypoints/0
DEL traefik/http/routers/${key}-router/service
DEL traefik/http/services/${key}-service/loadbalancer/servers/0/url
EXEC
EOF
    done
    exit 0
}

trap 'cleanup' INT

setup
tail -f /dev/null
The only thing left to do is to try it out:
local:~$ ssh -R 0:127.0.0.1:8080 -R 0:127.0.0.1:8081 mole@tunnel.example.org
Allocated port 34021 for remote forward to 127.0.0.1:8080
Allocated port 39097 for remote forward to 127.0.0.1:8081
http://dkchdfskxz.tunnel.example.org/ -> 127.0.0.1:34021
http://kzhrwsmgqk.tunnel.example.org/ -> 127.0.0.1:39097
Also, in another terminal, we can check out the HTTP request:
local:~$ curl http://dkchdfskxz.tunnel.example.org/
hello world
As you can see, we can only tell what the random port is that sshd has assigned to us on the tunnel side, we don't know what port it corresponds to on the local machine. Luckily the SSH client prints it out, so we can put the whole chain together, but it can be a bit inconvenient with multiple remote forwards.
Of course, there is still a lot of room for improvement here as well, such as:
- making sure that the random generated by
pwgendoes not already exist in Redis - a periodic cleanup script to delete stuck Redis keys that are no longer working
- HTTPS, mTLS, authentication
Summary
As is usually the case, it is probably not worth building your own solution from scratch for a system used daily by several people, when there are so many ready-made solutions available. However, it can never hurt to know how such a system works under the hood.
It may be worth keeping in mind the easy mode trick, it may even prove useful in the future. SSH is a fantastic thing.