The time has (not yet) come
Creating a desk clock with Raspberry Pi Pico
I've been thinking for a while now that it would be an interesting project to put together a desk clock. It could have, say, a stopwatch, multiple countdown timers that can run in parallel, maybe displaying temperature and humidity as well, that sort of thing. But life's not that easy, so we won't get that far.
First of all, I ordered some parts:
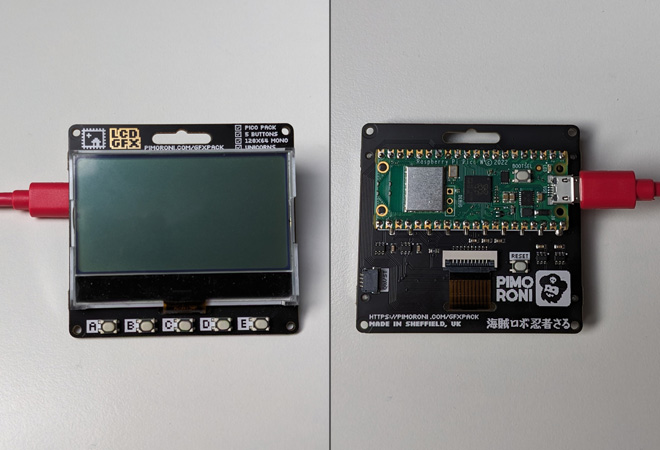
- a backlit LCD with some buttons on it
- a Debug Probe, which I just wanted to try out
- and a Pico W to power it all
Then the fun can begin... after we forget about it all for a month or so.
C/C++ SDK
The problems have started to appear with the Debug Probe already. Although the thing is smaller than if we had converted a Pico, but it cannot power the Pico being debugged, so overall, the more cables made it a bit of a letdown for me.
Regardless of whether it was a Picoprobe or a Debug Probe, in both cases, I needed extra hardware (which I purchased earlier, fortunately) to connect both the display and the probe to the Pico at the same time.

I've mentioned before that the CLion solution worked quite well on Linux, but on Windows I couldn't get it to work. This is only a problem because I have Linux installed on my laptop and Windows on my desktop and it's inconvenient for me to do longer development projects on a laptop.
So I tried to get it to work on Windows again, this time using WSL2. Things installed nicely in WSL2 according to the Linux guide and with the help of usbipd-win I was able to share the Pico with it. CLion has WSL2 support too, so it was able to build the project successfully, but it can't run OpenOCD in WSL2, so unfortunately, debugging didn't work. There is a ticket about it, so maybe this will be fixed one day.
This is a good way to get a project abandoned for a while (or forever), but in this case, I had another plan. There is an alternative solution: MicroPython. If we can let go of the lightning-fast C code, we can write it all in Python. It might even be enough for a prototype.
MicroPython
Of course, I was not satisfied with the recommended (working) solution, which was the Python IDE called Thonny. I have no particular problem with it, but if I already have a PyCharm, I would like to use it. Fortunately, there is a MicroPython plugin for it, which allowed me to upload the code to Pico without any problems.
First, we need to copy the MicroPython UF2 file to the Pico. In our case, we need to use the one supplied by the LCD display manufacturer so that we can access the modules that drive the LCD. The hardware part is also made considerably simpler this way. No need for the Debug Probe, we can connect the Pico directly to the display.
Code completion
Life would obviously be too simple if everything just worked. The first problem was code completion. The MicroPython plugin has some support, but it was not enough. Fortunately, there are stubs like micropython-rp2-pico_w-stubs which partially solve the problem, but of course, because of the modified MicroPython, some modules are not known by this stub. Fortunately, the vendor has made a stub for their own modules, but I couldn't find an official pip package, so I just downloaded the ZIP and installed it from the filesystem.
I would like to say that everything went smoothly after that... but no. For example, there was the GfxPack class that PyCharm didn't recognize the display property of. I'm not that familiar with stubs, but at a glance that seemed fine:
class GfxPack:
    # ...

    def __init__(self):
        self.display: PicoGraphics
        self.i2c: PimoroniI2C
So there may be something wrong with PyCharm. When I modified the stub a bit, it worked well:
class GfxPack:
    # ...

    display: PicoGraphics
    i2c: PimoroniI2C

    def __init__(self):
        ...
But now. Everything must be good now, right? Wrong. Let's just say it's usable. There are still some oddities around imports, it doesn't offer to import certain modules, but if I import them manually, it recognizes them.
In any case, we can write code and run it on Pico, but the MicroPytho REPL within PyCharm doesn't work for some reason. We don't see any prints sent to serial or even the stack trace of an exception, which doesn't make life any easier. I can connect to it using PuTTY and it works, but as long as PuTTY is connected to it, PyCharm can't send code to it, so it's a bit inconvenient. I'm sure it would work on Linux.
The clock
We should create something clock-like at the end, so we have some sense of achievement. First, I drew the layout on the computer and exported it in WBMP format (anyone else remember WAP?), which I could then quite easily read and display on the screen so I could view it on the actual hardware.

from gfx_pack import GfxPack


gp = GfxPack()
gp.set_backlight(0, 180, 60, 140)

with open('pico-clock.wbm', 'rb') as f:
    buffer = bytearray([b ^ 0xFF for b in f.read()[-1024:]])

gp.display.set_framebuffer(buffer)
gp.display.update()
The WBMP format has a variable size header at the beginning, but we know the size of the data because the display (and therefore the image) is 128*64 pixels. Each bit stores the state of one pixel, so the data is (128/8)*64, or 1024 bytes. Fortunately, the format of the framebuffer is exactly the same, so we have an easy job. The image originally appeared as a negative, so we had to invert the bits using b ^ 0xFF.
There were also some minor problems around PyCharm again. It didn't automatically copy the image file to Pico, I had to right-click on the file and press Run 'Flash pico-clock.wbm...' (every time the image was updated).
Now that we have the layout, we can forget about it and finally put together a prototype. The first step would be to get on WiFi and get an accurate time using NTP:
import network
import ntptime
import time


wlan = network.WLAN(network.STA_IF)
wlan.active(True)
wlan.connect('SSID', 'secret')

while not wlan.isconnected():
    print('WLAN is not ready\n')
    time.sleep(1)

ntptime.host = 'hu.pool.ntp.org'
ntptime.settime()

wlan.disconnect()
And then we display it nicely:
from gfx_pack import GfxPack


gp = GfxPack()
gp.set_backlight(0, 0, 0, 40)

while True:
    t = time.localtime()

    gp.display.set_pen(0)
    gp.display.clear()
    gp.display.set_pen(15)

    gp.display.set_font('bitmap6')
    gp.display.text(f'{t[0]}. {t[1]:02}. {t[2]:02}.', 0, 0)

    gp.display.set_font('bitmap14_outline')
    gp.display.text(f'{t[3]:02}:{t[4]:02}', 0, 20)
    if t[5] % 2:
        gp.display.set_pen(15)
    else:
        gp.display.set_pen(0)
    gp.display.text(':', 32, 20)

    gp.display.update()

    time.sleep_ms(30)
Maybe even add some backlight to it to make it look a bit more like a Casio watch from the nineties.
light_timeout = None
while True:
    if not light_timeout and gp.switch_pressed(SWITCH_E):
        light_timeout = time.time_ns() + 2000000000
        gp.set_backlight(0, 180, 60, 140)

    if light_timeout and light_timeout < time.time_ns():
        light_timeout = None
        gp.set_backlight(0, 0, 0, 40)

    # ...
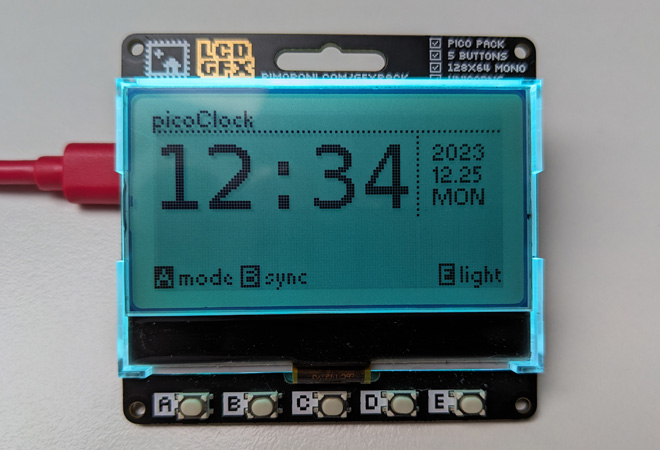
The final result (after adding some extra status information):
Even for a prototype, it's still missing a lot of things, but unfortunately, this is as far as the project got in the first round. Also, MicroPython can't handle time zones, so we have to move to a country with a UTC timezone to use it.
What will happen to the clock after this? Will it go to the bottom of the drawer or will we see it in the future? Only time will tell.